
Your DAW plays through your speakers. Your browser only knows about microphones. Somewhere between the two sits the question every producer hits the first time they want to send a mix live to someone else: how do I get the sound of this app into that browser tab?
The answer is a virtual audio cable: a small, free driver that shows up as one more audio device on your computer. Whatever you play into it comes out on the other end as an input the browser can capture, exactly as if it were a microphone. No plugin in the DAW, no app on the other side. Five minutes, once, and it works for any program: your DAW, Spotify, YouTube, a video call, a game.
This guide sets it up on macOS with BlackHole and on Windows with VB-CABLE, and then plugs it into a trakk'em live stream so anyone with your link hears the same audio, in lossless, from a web page. The routing part is generic: it works for any browser-based tool that takes an audio input. Every step below comes from the drivers' own documentation, linked at the end.
How the cable works
Think of the virtual cable as a loopback: an audio output on one side, an audio input on the other, glued together inside the operating system.
- Your app (the DAW, the music player, anything) sends its sound to the cable's output side.
- The cable presents that same sound as an input device.
- The browser picks that input device and captures the signal.
The one thing to get right on both platforms is still hearing the audio yourself: if the DAW's only output is the cable, your speakers go silent. Each section below solves that.
macOS: BlackHole
BlackHole is a free, open-source virtual audio driver for macOS. The 2-channel version is all you need for stereo.
1. Install BlackHole
Download BlackHole 2ch from the official site, close your audio apps, run the installer and restart the Mac when it asks. Homebrew users: brew install blackhole-2ch. Afterwards, Audio MIDI Setup (in Applications > Utilities, or via Spotlight) lists a new device called "BlackHole 2ch".
2. Build a Multi-Output Device so you keep hearing your mix
This is the step people skip and then wonder why their speakers went quiet. From BlackHole's own guide:
- Open Audio MIDI Setup. If the Audio Devices window is not visible, open it from the Window menu.
- Click the + in the lower left corner and choose Create Multi-Output Device.
- In the list on the right, tick your speakers or audio interface and BlackHole 2ch. Your real output must be listed first (it is the clock source): if BlackHole ended up on top, untick and retick its Use box to change the order.
- Enable Drift Correction for every device except the clock source.
- Right-click the new device and choose Use This Device For Sound Output if you want all system audio to go through it (see the next step for the DAW-only case).
Two things to know: a Multi-Output Device has no master volume of its own, you adjust each member device in Audio MIDI Setup; and the real output must stay the top device or macOS may play nothing at all.
3. Point the app at the Multi-Output Device
- A DAW (Logic, Ableton Live, Pro Tools, Cubase, Studio One, Reaper): in the audio preferences, set the output device to the Multi-Output Device. The master bus now feeds both your speakers and the cable, with no change to your session and no change to the rest of the system.
- Everything else (Spotify, YouTube in another browser, a video call): make the Multi-Output Device the system output (step 5 above, or System Settings > Sound > Output). Every app that plays through the system now goes into the cable.
Sample rate: BlackHole runs at whatever rate the apps ask for, from 8 kHz up to 768 kHz. Keep the DAW, BlackHole and your interface at the same rate (44.1 or 48 kHz is the usual pair) so nothing on the path has to convert. You can set BlackHole's format explicitly in Audio MIDI Setup.
4. Pick BlackHole as the input in the browser
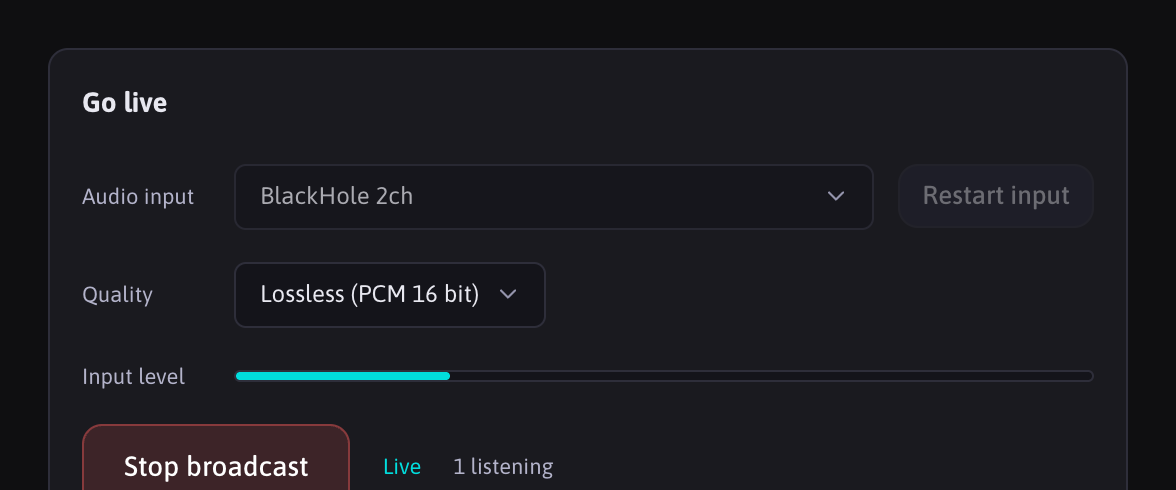
In trakk'em, open Streaming, choose BlackHole 2ch in the Audio input menu, press Start input and watch the level meter move. That is the whole connection.
A note on Loopback. Rogue Amoeba's Loopback (paid) does the same thing with a friendlier interface: you pick apps and it builds the virtual device for you, monitoring included. If you already own it, use it and skip the Multi-Output Device step.
Windows: VB-CABLE
VB-CABLE (donationware) is the Windows equivalent. It installs two devices: CABLE Input, a playback device, which is where you send audio; and CABLE Output, a recording device, which is what the browser captures. Everything that goes into the Input comes out of the Output.
1. Install VB-CABLE
Download the package, extract all the files, right-click the setup program and Run as administrator. Reboot when it asks (the manual insists on it, both after install and after uninstall). In Settings > System > Sound you now see CABLE Input under Output and CABLE Output under Input.
2. Route the app into the cable
- Any regular app (Spotify, a browser, a media player): in Settings > System > Sound > Volume mixer, pick the app and set its output device to CABLE Input (VB-Audio Virtual Cable). Only that app goes into the cable; the rest of Windows stays on your speakers. Setting CABLE Input as the default output device sends everything there instead.
- A DAW: here it depends on the driver mode your DAW is using. VB-CABLE speaks the standard Windows audio interfaces (MME, WASAPI, KS, DirectX) but is not an ASIO driver, so a DAW running on ASIO cannot select it directly. Your options, from simplest to most flexible:
- Switch the DAW to a WASAPI or MME driver mode and pick CABLE Input as the output. Reaper, FL Studio and Ableton Live all offer this; latency is higher than ASIO but for playback into a stream it does not matter.
- Use ASIO4ALL (free) as the DAW's ASIO driver and enable both your interface and CABLE Input inside it, so the DAW sees them as one device.
- Use VB-Audio's own Hi-Fi Cable + ASIO Bridge, a separate free package built exactly for connecting an ASIO device to a virtual cable. Note that the Hi-Fi Cable has no sample-rate converter, so every side must run at the same rate.
3. Keep hearing it: enable "Listen to this device"
Windows has no Multi-Output Device, but it has a monitor toggle on any recording device:
- Open the classic Sound control panel (Settings > System > Sound > More sound settings, or press Win+R and run
mmsys.cpl). - On the Recording tab, open CABLE Output > Properties.
- On the Listen tab, tick Listen to this device and choose your speakers or interface under Playback through this device.
What goes into the cable now also plays out of your speakers. This monitoring path runs through the Windows mixer, so it adds a little latency: fine for listening to your own stream, not for performing live against it.
4. Match the sample rates
VB-CABLE works at a fixed internal rate (48 kHz by default on Windows 10/11) and converts anything that arrives at another rate. Its manual is explicit: when both sides run at the internal rate, the audio passes through with no conversion at all, which is what you want. So set the same rate in three places: the DAW, the Default Format on the Advanced tab of both CABLE Input and CABLE Output, and the cable's internal rate (VB-CABLE Control Panel, run as administrator so the setting sticks). If your project is at 44.1 kHz, set all of them to 44.1.
5. Pick CABLE Output as the input in the browser
In trakk'em Streaming, choose CABLE Output (VB-Audio Virtual Cable) in the Audio input menu, start the input and check the meter.
What the browser does with it (and what it must not do)
A browser treats every audio input as a microphone, and browsers offer three processing switches on a microphone: echo cancellation, noise suppression and automatic gain control, which a page can request or refuse. On a voice call they are welcome. On music they are a disaster: the noise gate eats reverb tails, the auto gain pumps your dynamics, echo cancellation can mute a chunk of the stereo image.
Whatever tool you route into, check that it captures raw audio. trakk'em refuses all three on purpose and streams the signal at the device's own sample rate, untouched; what your listeners get is the tier they pick on their side: lossless PCM, or Opus at about 320 or 128 kbps for people on a thin connection.
Checklist before you go live
- The level meter moves when you press play in the app. If it stays flat, the app is still playing to your speakers and not to the cable.
- You can hear the audio yourself (Multi-Output Device on Mac, "Listen to this device" on Windows).
- DAW, cable and interface run at the same sample rate.
- Nothing else is talking on the same cable (a notification sound from another app goes straight into the stream).
Then press Go live, and send the link. Your listeners open it in any browser, on any device, and hear exactly what is leaving your master bus.
What this replaces
Tools like Audiomovers LISTENTO put a transmitter plugin inside your DAW and give every listener an app or a receiver plugin. That is a polished way to do the same job, at a price, and with something to install on both ends. The virtual cable route costs nothing, takes five minutes, and turns any app into a source; and on the listening side there is nothing to install at all, only a link. See trakk'em live streaming for what happens after the cable: the permanent link, the waiting room, the per-listener stats.
Sources
- BlackHole on GitHub: install methods, supported sample rates, guides.
- BlackHole wiki: Multi-Output Device: the step-by-step reproduced above, including the clock-source and drift-correction notes.
- VB-CABLE product page: device names, install as administrator, reboot, supported interfaces, donationware license.
- VB-CABLE Reference Manual (PDF, October 2024): default 48 kHz format, internal sample rate and the no-conversion pass-through rule, Control Panel, Hi-Fi Cable and ASIO Bridge.
- MDN: MediaTrackConstraints: the echoCancellation, noiseSuppression and autoGainControl constraints a page controls.